Modding: Character Add-on
So you want to know how to add your own kooky character(s) to Expandyssey: The Elastic Modulus? There are a few easy steps to add a wide variety of characters to the game.
Step 1: Draw some sprites
So far the game takes in 6 different files to allow your character to run around. These are: idle right facing, idle left facing, moving right, moving left, belly with varying sizes, and a tail (optional). When making these files, make sure that:
- Your character is centered
- When doing frames, make sure that each frame is of equal size and they are laid out horizontally
- The Belly by default is drawn 17 pixels above the sprites' center (for a 32x32, that would be 16:31)
- The part of the tail that connects to the character is on the right side
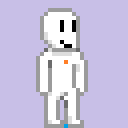
The orange pixel is where the belly sprite's centered on the character sprite (top left of pixel), and the blue pixel is where the sprite's overall center is for the game. If you would like a character template, you can download the Gene Whicon DLC and observe how that character is put together. By default, character frames are typically 32x32.
Step 2: Make a Mod Pack
Now that you have the character drawn up, it's time to add them to the game. Navigate your computer to:
Windows: "%localappdata%/ExpandysseyTEM"
Linux: "/home/<username>/.config/ExpandysseyTEM"
If you do not see it and your running 1.2.1, run the game, navigate to the pause menu, select options, and select accept. This should generate the folder for you. You do not need the game in this folder as it is its working directory, meaning it can only see files and manage them within this folder.
If you haven't added the Thine First DLC, create a folder named "Content". In that folder make another folder and name it however you want. Typically name it the same as the "mod" your adding. In your "mod" folder create one last folder and give it the name of your character your adding. This folder is where you copy and paste your character images. Go back to your "mod" folder and create a .txt file named "Start.txt". The file structure should look something like this:
>ExpandysseyTEM
--options.ini
->Content
-->"mod"
----Start.txt
--->"character"
-----image files of said "character"
Step 3: Code the Mod Pack
Now that you have all the files you need, open the "Start.txt" file in a basic .txt file editor like Notepad or Notepad++. You should first write and describe in general what your mod pack does, you can use the "//" comment lines or "/* */" comment block. However, if you use the comment block, the character "*/" MUST be on a new line.
Your next line should declare for what version this mod is intended for. It's not necessarily required, but it's used as a safety measure and to let the program know how to handle the mod if it's outdated. The line you should write is "version = 1.2.1" or something similar.
Next is where we start importing your character. Write this line, filling in the parameters with quotes when indicated:
v = newCharacter("Name","Title","Fill Types",Belly Size (Max, optional),Height (in inches, optional),Weight (in lbs, optional));
- "Name" is a string (requiring quotes) that is the name of the character.
- "Title" is a string that is the title of the character.
- "Fill Type" is a string list written as "00,01,02" with pairs of numbers representing the types of substances they can consume. A list will be provided later in the document.
- Belly Size is an integer (a whole number, these must be positive in this case) that dictates how big the character's belly can get. This is optional with the default being 8.
- Height is an integer that tells how tall the character is in inches. This is optional with the default of 64" (5'4").
- Weight is an integer that tells how heavy a character is in pounds (lbs). This is optional with the default of 150lbs.
Now assigning newCharacter() to "v" is important, as this integer dictates the index/id of your character. You must complete all your editing with that character before adding a new one with the newCharacter() function again!
Now you can import the images from the character folder in this format using the sprite_add() function and assigning to the global sprite double array g.draw:
g.draw[v,<index>] = sprite_add("<foldername>/file.extension",number of frames,remove background?,smooth?,x origin,y origin);
- g.draw is a global double array that holds all the character's sprites. It's first index is the character id, so "v" should be add as such since we are working on the current character. The second index labelled <index> is the type of animation it should be. A list for these indexes will be provided later in the document.
- <foldername> should be the name of the character folder you wish to import. File.extension should be the entire name of the image file, including its extension, that your assigning to that index. The .PNG format is recommended.
- number of frames is an integer that indicates how many frames of animation the sprite has. This is optional, and its default is 1.
- remove background? is a boolean (1 is true, 0 is false, a simple yes/no, true/false parameter) that asks if the background to the sprite should be removed or not. This is optional and is defaultly 1.
- smooth? is a boolean that asks if it should smooth the edges of the sprite or not. This is optional and is 0 by default.
- x origin is an integer that places the x origin of the sprite. This is optional and is defaultly 16. This should be changed when importing the belly, to the value of 0.
- y origin is an integer that places the y origin of the sprite. This is optional and is defaultly 31. This should be changed when importing the belly to 0, and to 8 when importing your tail (assuming your tail is a 16x16 sprite, otherwise make the value half of the sprite's height).
Lastly, to make it so the player can access your new character, let's add them to the roster. Use this line to add them into the game and to be usable:
g.roster[v,0] = v;
This just adds your current character to the end of the global double array g.roster.
Now, in 1.2.1, we can edit the character's stats before we are done with them. We can access the character's stat array with the global double array g.chara by using this:
g.chara[v,#] = value;
A list will be provided later in the document for the indexes you can access with this, however I will list the notable ones here and how to handle them properly.
- Index 6: movement speed for first player, this 6 by default.
- Index 7: jump height for first player, this is -7 by default. Jump height MUST be a negative number or else the character cannot jump.
- Index 26: movement speed for second player, this 6 by default.
- Index 27: jump height for second player, this is -7 by default.
Step 4: Enjoy!
Now boot up the game and have fun with your 20+ belly sized kangaroo with super jump and cheetah speed, or whatever character you come up with! Happy gaming/modding!
Closing thoughts
Though there might not be a lot to play with right now, and some (if not most) practices will need to be revised after a future update. I recommend having a separate file that has your character in parts, as a future update will require the character to be more sliced up for a paper doll like system.
FAQ:
Question: What if I don't have photoshop to make a transparent background?
Answer: You don't necessarily need a fancy art program like that, a simple program like MSPaint is fine. Just make the color that you want removed from the background be different from your character. However make sure that the bottom right pixel is the color you want removed.
Features planned for character creation:
- Built in workshop feature to allow players to create their characters easier with an array of templates and premade options.
- Missing Texture parts for if something fails to load, but to keep it from crashing the game.
- Option to add more parts to character such as "Halo"s and Wings.
- Auto detect parameter so strings do not always need quotes
- Add array syntax variant (so it could support arrays written like arr[#,#])
- Allow alternate access in the g.roster, and if not @Override or @Insert, add the alternate to the end of the alternate list.
- Combine 1st player's and 2nd player's stats
Reference to Fill Types:
Those that have a strike through them are currently unimplemented but are (hopefully) planned for in later updates. Not all fillings are listed.
00 = Air
01 = Helium
02 = Food
03 = Fire04 = Object "Vore"05 = Magic06 =Candy07 = Vore
08 = Water09 = Cotton
10 = Data
11 = Electricity12 = Slime
Reference to the sprite array [g.draw]:
[#,0] = idle_Right
[#,1] = idle_Left
[#,2] = move_Right
[#,3] = move_Left
[#,4] = Belly
[#,5] = Tail
Reference to the ungodly dumb array for [g.chara]:
[#,0] = "Name";
[#,1] = "Title";
[#,2] = "Filltype";
[#,3] = 0; //Current Filltype
[#,4] = 0; //Bellyfill
[#,5] = 8; //Bellyfill max
[#,6] = 6; //Walk Speed
[#,7] = -7; //Jump speed/how high jump is, jaccel
[#,8] = 65; //Character height (1 pixel = 1 inch)
[#,9] = 16; //Character width, recalculate in testing
[#,10] = 150; //Character weight (in US pounds)
[#,11] = [#,8]; //Character current height
[#,12] = [#,9]; //Character current width
[#,13] = [#,10]; //Character current weight
[#,14] = 0; //Potion effect
[#,15] = 0; //Potion timer
[#,16] = false; //Locked?
[#,17] = false; //Invisible to GUI
[#,18] = false; //Non-Symmetrical head (true = non-sym, false = sym)
[#,19] = false; //Non-Symmetrical body parts? (true = no sym, false = sym)
//Player 2 Variables
[#,20] = [#,8]; //Character current height
[#,21] = [#,9]; //Character current width
[#,22] = [#,10]; //Character current weight
[#,23] = 0; //Current Filltype
[#,24] = 0; //Bellyfill
[#,25] = [#,5]; //Bellyfill max
[#,26] = 6; //Walk Speed
[#,27] = -7; //Jump speed/how high jump is, jaccel
[#,28] = undefined; //Placeholder
Leave a comment
Log in with itch.io to leave a comment.